Create a release based workflow that is built on the foundations of the GitHub flow. When your team uses a release-based workflow, GitHub makes it easy to collaborate with deployable iterations of your project that you can package and make available for a wider audience to download and use.
GitHub releases allow your team to package and provide software to your users based on a specific point in the history of your project.
- Who is this for: Developers, DevOps Engineers, IT Operations, managers, and teams.
- What you'll learn: How to follow a release-based workflow.
- What you'll build: You will create tags, releases, and release notes.
- Prerequisites: If you need to learn about branches, commits, and pull requests, take Introduction to GitHub first.
- How long: This course is 7 steps long and takes less than 1 hour to complete.
- Above these instructions, right-click Use this template and open the link in a new tab.

- In the new tab, follow the prompts to create a new repository.
- For owner, choose your personal account or an organization to host the repository.
- We recommend creating a public repository-private repositories will use Actions minutes.

- After your new repository is created, wait about 20 seconds, then refresh the page. Follow the step-by-step instructions in the new repository's README.
The GitHub flow is a lightweight, branch-based workflow for projects with regular deployments.
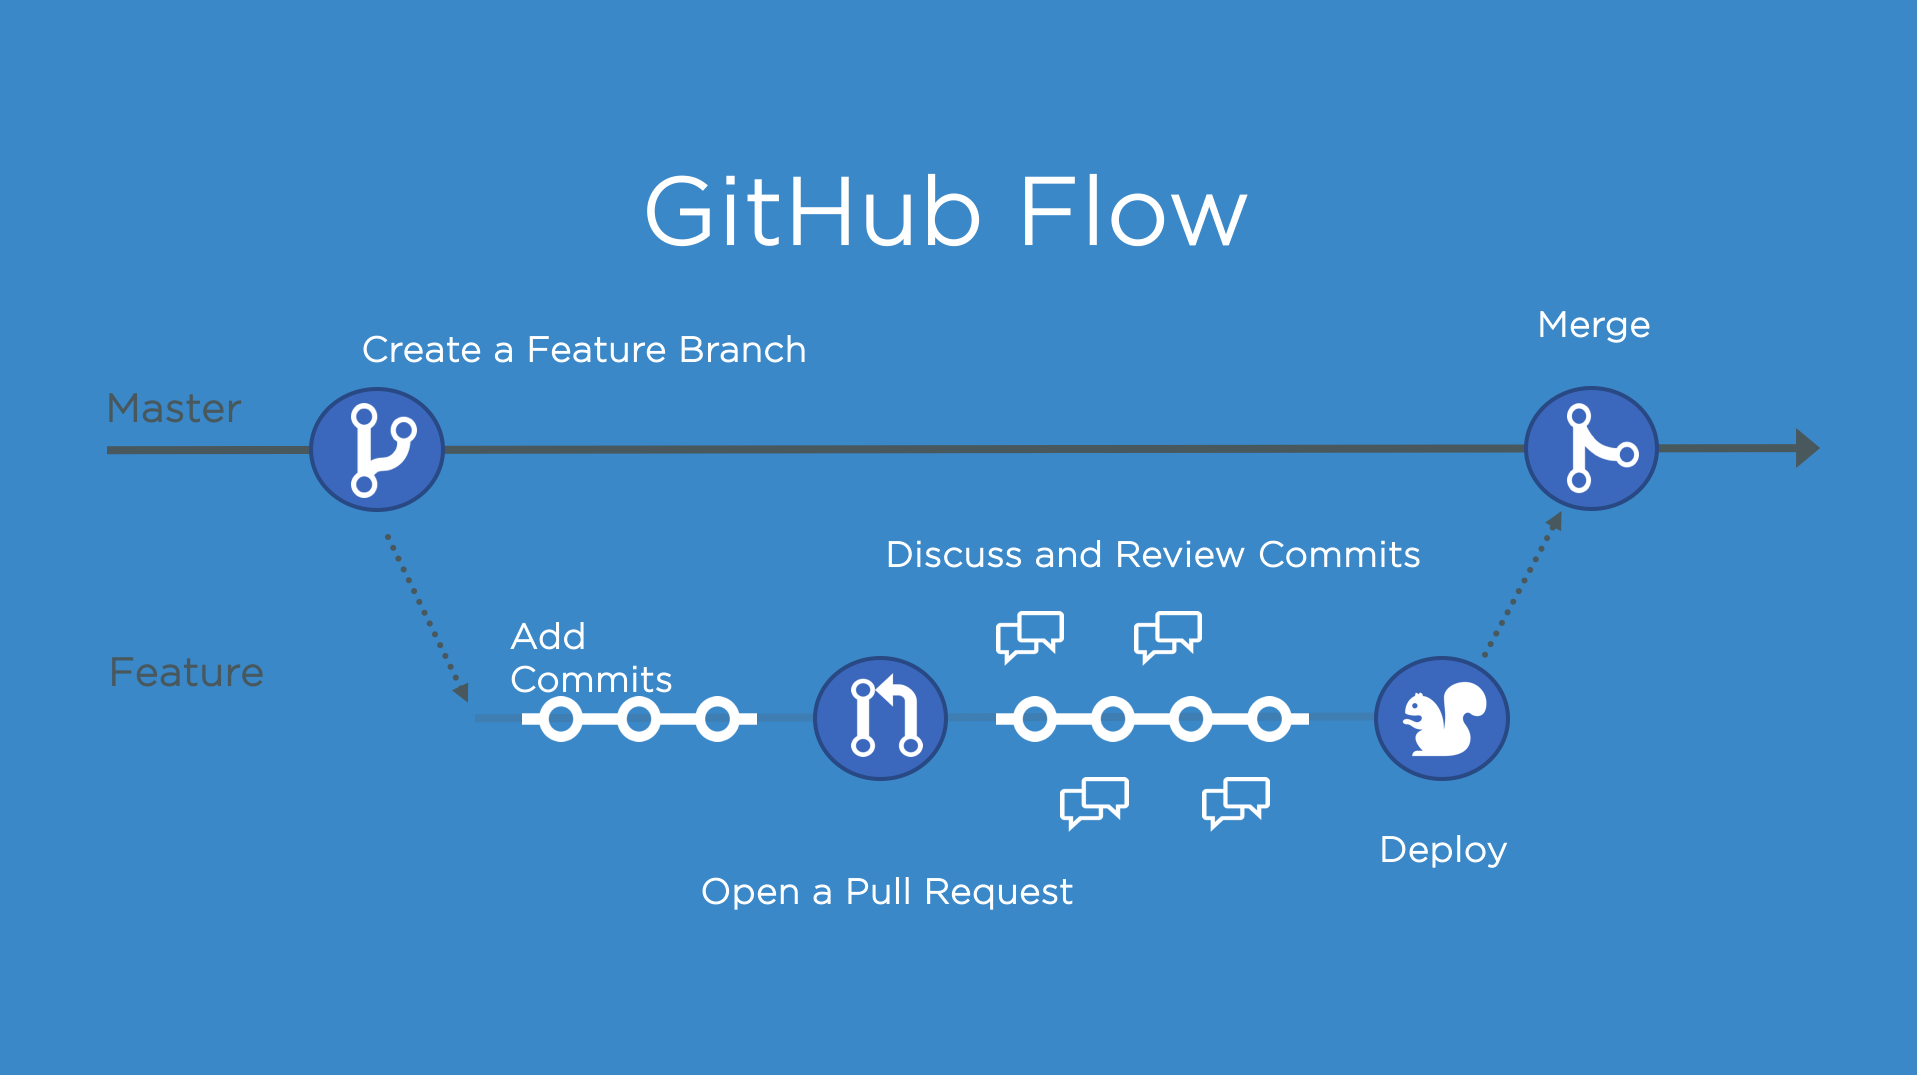
Some projects may deploy more often, with continuous deployment. There might be a "release" every time there's a new commit on main.
But, some projects rely on a different structure for versions and releases.
Versions are different iterations of updated software like operating systems, apps, or dependencies. Common examples are "Windows 8.1" to "Windows 10", or "macOS High Sierra" to "macOS Mojave".
Developers update code and then run tests on the project for bugs. During that time, the developers might set up certain securities to protect from new code or bugs. Then, the tested code is ready for production. Teams version the code and release it for installation by end users.
In this step, you will create a release for this repository on GitHub.
GitHub Releases point to a specific commit. Releases can include release notes in Markdown files, and attached binaries.
Before using a release based workflow for a larger release, let's create a tag and a release.
- Open a new browser tab, and work on the steps in your second tab while you read the instructions in this tab.
- Go to the Releases page for this repository.
- You can click the Code tab at the top of your repository. Then, find the navigation bar below the repository description, and click 0 releases.
- Click Create a new release
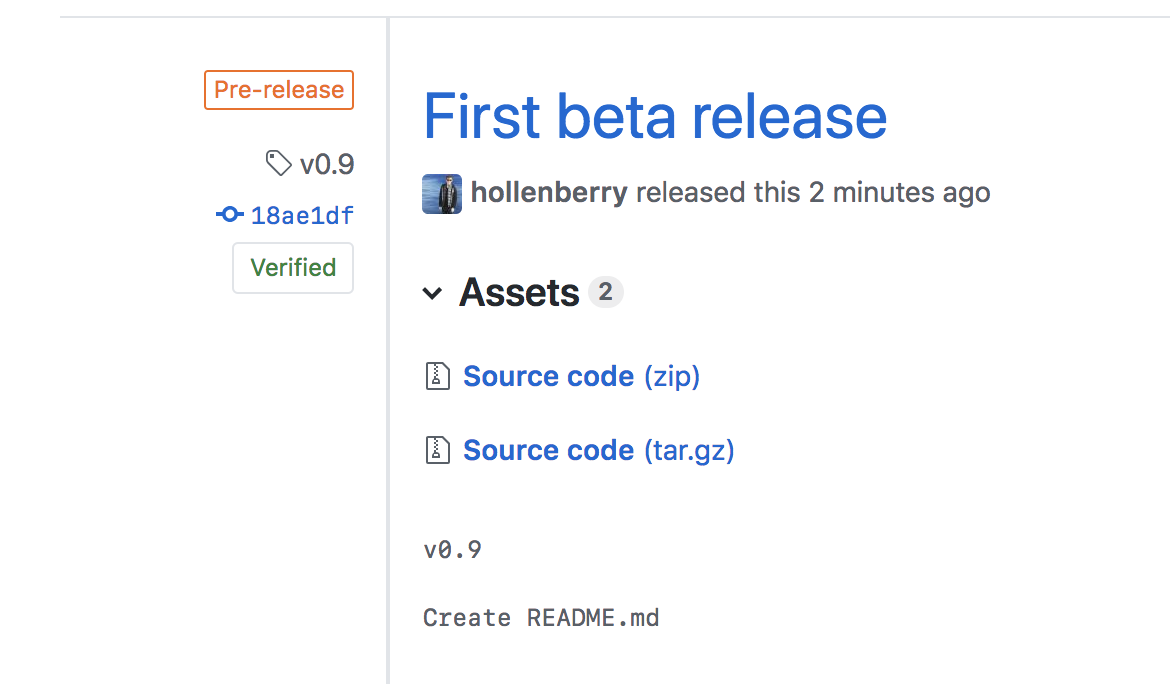
- In the field for Tag version, specify a number. In this case, use v0.9. Keep the Target as main
- Give the release a title, like "First beta release". If you'd like, you could also give the release a short description
- Select the checkbox next to This is a pre-release, since it is representing a beta version
- Click Publish release
- Wait about 20 seconds then refresh this page for the next step
As you prepare for a future release, you'll need to organize more than the tasks and features. It's important to create a clear workflow for your team, and to make sure that the work remains organized.
There are several strategies for managing releases. Some teams might use long-lived branches, like production, dev, and main. Some teams use simple feature branches, releasing from the main branch.
No one strategy is better than another. We always recommend being intentional about branches and reducing long-lived branches whenever possible.
In this exercise, you'll use the release-v1.0 branch to be your one long-lived branch per release version.
Like the main branch, you can protect release branches. This means you can protect branches from force pushes or accidental deletion. This is already configured in this repository.
Releases are usually made of many smaller changes. Since we don't know of any bugs, we'll focus on a few features to update on our game before the version update.
- You should update the page background color to black.
- I'll help you change the text colors to green.
- Create a new branch and change the
bodyCSS declaration inbase.cssto match what is below. This will set the page background to black
body {
    background-color: black;
}
- Open a pull request with
release-v1.0as thebasebranch, and your new branch ascompare - Fill in the pull request template to describe your changes
Even with releases, the GitHub flow is still an important strategy for working with your team. It's a good idea to use short-lived branches for quick feature additions and bug fixes.
Merge this feature pull request so that you can open the release pull request as early as possible.
- Click Merge pull request, and delete your branch.
- Wait about 20 seconds then refresh this page for the next step.
You should open a pull request between your release branch and main as early as possible. It might be open for a long time, and that's okay.
In general, the pull request description can include:
- A reference to an issue that the pull request addresses.
- A description of the changes proposed in the pull request.
- @mentions of the person or team responsible for reviewing proposed changes.
To expedite the creation of this pull request, I've added a pull request template to the repository. When you create a pull request, default text will automatically be displayed. This should help you identify and fill out all the necessary information. If you don't want to use the template content, just remove the text from the pull request and repace it with your pull request message.
Let's make a new pull request comparing the release-v1.0 branch to the main branch.
- Open a new browser tab, and work on the steps in your second tab while you read the instructions in this tab
- Open a new pull request with
base: mainandcompare: release-v1.0 - Ensure the title of your pull request is Release v1.0
- Include a detailed pull request body, an example is below
## Description: - Changed page background color to black. - Changed game text color to green. - Wait about 20 seconds then refresh this page for the next step
Automatically generated release notes provide an automated alternative to manually writing release notes for your GitHub releases. With automatically generated release notes, you can quickly generate an overview of the contents of a release. Automatically generated release notes include a list of merged pull requests, a list of contributors to the release, and a link to a full changelog. You can also customize your release notes once they are generated.
- In a separate tab, go to the Releases page for this repository.
- Tip: To reach this page, click the Code tab at the top of your repository. Then, find the navigation bar below the repository description, and click the Releases heading link
- Click the Draft a new release button
- In the field for Tag version, specify
v1.0.0 - To the right of the tag dropdown, click the Target dropddown and select the
release-v1.0branch- Tip: This is temporary in order to generate release notes based on the changes in this branch
- To the top right of the description text box, click Generate release notes
- Review the release notes in the text box and customize the content if desired
- Set the Target branch back to the
main, as this is the branch you want to create your tag on once the release branch is merged - Click Save draft
You can now merge your pull request!
- In a separate tab, go to the Pull requests page for this repository.
- Open your Release v1.0 pull request
- Click Merge pull request.
- Wait about 20 seconds then refresh this page for the next step.
It's important to be aware of the information what will be visible in that release. In the pre-release, the version and commit messages are visible.
Semantic versioning is a formal convention for specifying compatibility. It uses a three-part version number: major version; minor version; and patch. Version numbers convey meaning about the underlying code and what has been modified. For example, versioning could be handled as follows:
| Code status | Stage | Rule | Example version |
|---|---|---|---|
| First release | New product | Start with 1.0.0 | 1.0.0 |
| Backward compatible fix | Patch release | Increment the third digit | 1.0.1 |
| Backward compatible new feature | Minor release | Increment the middle digit and reset the last digit to zero | 1.1.0 |
| Breaking updates | Major release | Increment the first digit and reset the middle and last digits to zero | 2.0.0 |
Check out this article on Semantic versioning to learn more.
Now let's change our recently automated release from draft to latest release.
- In a separate tab, go to the Releases page for this repository
- To reach this page, click the Code tab at the top of your repository. Then, find the navigation bar below the repository description, and click the Releases heading link
- Click the Edit button next to your draft release
- Click the Draft a new release button
- Ensure the Target branch is set to
main - Click Publish release
- Wait about 20 seconds then refresh this page for the next step
Notice that I didn't delete the branch? That's intentional.
Sometimes mistakes can happen with releases, and we'll want to be able to correct them on the same branch.
Now that your release is finalized, we have a confession to make. Somewhere in our recent update, I made a mistake and introduced a bug. Instead of changing the text colors to green, we changed the whole game background.
Tip: Sometimes GitHub Pages takes a few minutes to update. Your page might not immediately show the recent updates you've made.

"Hotfixes", or a quick fix to address a bug in software, are a normal part of development. Oftentimes you'll see application updates whose only description is "bug fixes".
When bugs come up after you release a version, you'll need to address them.
We've already created this branch and pull request. The suggested change will be merged into the main branch. Later we will cherry-pick the hotfix commits into the release branch.
Submit a hotfix by approving and merging the pull request.
- In a separate tab, go to the Pull requests page and view the open pull request
- Review the changes and approve the pull request
- Click Merge pull request
- Wait about 20 seconds then refresh this page for the next step
You updated the source code, but users can't readily access your most recent changes. Prepare a new release, and distribute that release to the necessary channels.
With descriptive pull requests and auto generated release notes, you don't have to spend a lot of time working on your release draft. Follow the steps below to create your new release, generate the release notes, and publish.
- In a separate tab, go to to the Releases page for this repository
- Tip: To reach this page, click the Code tab at the top of your repository. Then, find the navigation bar below the repository description, and click the Releases heading link
- Click the Draft a new release button
- Set the Target branch to
main- Tip: Practice your semantic version syntax. What should the tag and title for this release be?
- To the top right of the description text box, click Generate release notes
- Review the release notes in the text box and customize the content if desired
- Click Publish release
- Wait about 20 seconds then refresh this page for the next step
Here's a recap of all the tasks you've accomplished in your repository:
- Create a beta release.
- Add a new feature to the release branche.
- Open a release pull request
- Automate release notes.
- Merge and finalize the release branch.
- Commit a hotfix to the release.
- Create release v1.0.1.
- We'd love to hear what you thought of this course.
- Take another GitHub Skills course.
- Read the GitHub Getting Started docs.
- To find projects to contribute to, check out GitHub Explore.
Get help: Post in our discussion board • Review the GitHub status page
© 2022 GitHub • Code of Conduct • CC-BY-4.0 License